I finally dug into checking my raw water pump impeller on the tug. I started to do the job last fall, and when I saw that the pump was buried below the alternator and facing rearward, I thought – I’ll leave it for now, as my engine is running fine.
The impeller change was on my list, and after doing all the other maintenance tasks on my list, only this job remained. I knew sooner or later I’d need to tackle and understand it, and I finally got to it.
We’re living in such a great time for learning engine maintenance. I searched online for replacing the impeller on my Yanmar 4JH3-TE engine raw water pump and read quite a bit of advice before I started.
I closed the raw water thru-hull seacock valve, and got down to business. I first saw the wires coming up to the alternator were weaving through the two hoses on the raw water pump. So, I disconnected the wiring and rerouted it over the hoses so it was not in the way. Next, I looked at the pump. I removed the cover plate, and saw it was not going to be easy to remove the impeller. It’s not something that just pulls out, like an air filter. I tried to pull on the impeller in the confined space, and it wasn’t moving.
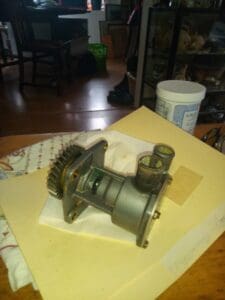
Then I looked at the whole pump, and remembered a post about removing it altogether, instead of trying to remove the impeller with the pump in place. Viola. The pump is held on with just 3 bolts and a nut on a stud bolt. First, I removed both hoses from the pump, which came off surprisingly easy. Then I backed out the three bolts and the nut, which also backed out easily. The pump itself was easily grasped and removed in the palm of my hand, and I soon had it up on the deck of the helm.
Now to remove the impeller. Although no fins were missing, I could see some were broken on one side, and it was surely time for a change. One post said locking needle nose pliers were a good tool for gripping the impeller to remove it, so off I went to Ace Hardware and found the pliers for 20 bucks. I removed the impeller by locking the jaws in there, and working the impeller back and forth until it finally gave way and came out a little at a time.
From more online advice, I found a zip tie big enough to wrap around the fins of the new impeller, and tightened it so the fins were bent in the proper direction. This allowed me to install the impeller on the shaft, and as I worked the impeller inside the housing and down the shaft, the zip tie worked itself up and off the impeller as the impeller seated itself in the pump housing.
I made the mistake of replacing the old O ring with one that came with the new impeller that was the same diameter, but a smaller thickness, than the old one. I first tested the pump for leaks by pouring water in the pump and moving the gear by hand. No water leakage, so maybe I’m good. I reinstalled the pump. I opened up the through hull valve for the raw water pump intake, and started the engine. The pump leaked like a sieve…..
I removed the pump again, reinstalled the old O ring (which I cleaned off and coated in vaseline), then put a border of red RTV high temp permatex to form a gasket on the cover plate, as a back up. I screwed down the cover plate, wiped off the permatex that squeezed out, and let the pump sit for 24 hrs per the permatex directions to let the gasket dope set up.
I could have just gone with the O ring and hoped it didn’t leak, as there was no gasket there when I removed the cover plate, but I didn’t want to have to remove the pump again if I didn’t have to. So, I don’t know if it was just the O ring that made for proper sealing, or if I actually needed the additional red permatex.
When I cranked it up this time, there were no leaks. Now, the overboard raw water discharge showed a steady stream now, and not a pulsing action as with the old impeller.
One problem with the pump install is getting the nut on the stud bolt. I wish the engineers would have put that stud on the outside, where it’s easy to get to for hand starting the nut, instead of the inside next to the engine, where I can’t get my big mitt.
After several trial and errors trying to balance the nut in the socket to start it, and retrieving the nut from the bilge, I put a piece of electric tape across the mouth of the socket, and jammed the nut into the tape and into the socket. That held the nut for me to start it on the bolt. Once the nut started on the bolt, I just peeled the tape off.
So, another task learned, and ready with confidence for next time. And really glad I did this tied up to the dock, and not in an emergency situation for the first time in heavy seas. This was simple enough to do every year when I change the fuel filter.